Selecting the right materials matters when a mobile kitchen faces heat, humidity, and constant use. Tucker Ballister grew up RV camping in a Fleetwood Bounder and now owns a 2025 Forest River Campsite Ultra 26BW, so he knows how travel stresses surfaces.
Choosing the best countertop for camper van kitchen projects means balancing weight against durability. Some RV makers tout solid surface or thermoformed options, but owners must match a material to their rig and layout.
This short guide reviews how various countertops respond to heat, moisture, and movement. It helps both a DIY enthusiast and a pro builder plan a renovation that stays functional for years.
Practical planning includes testing finishes, checking seams, and picking a waterproof surface. For an example of an epoxy tabletop solution and prep tips, see this practical write-up at a detailed project page.
Understanding the Requirements for a Camper Van Kitchen
Limited space and constant motion change how surfaces, sinks, and cabinets perform over time. A clear list of needs helps pick the right materials and layout. This section covers the key constraints designers faced when outfitting a mobile kitchen.
Heat Resistance
Heat from the stove sits close to the countertop and can warp or stain many surfaces. Materials must tolerate direct heat and repeated exposure from daily brewing and cooking.
Designers recommended locating ventilation near the stove and leaving buffer space between burners and sensitive materials. Cabinets must also support heavy sinks and surfaces without sagging.
Moisture Management
RV countertops were often built in place, so moisture can seep into seams and edges. Proper sealing and drainage around the sink prevent rot and delamination.
- Typical depth ranges from 18 to 24 inches; measure the area carefully.
- Good ventilation reduces humidity that damages cabinets and finishes.
- Plan layouts that maximize prep space while protecting key components.
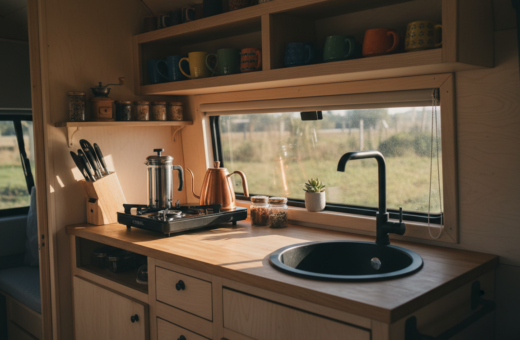
Evaluating the Best Countertop for Camper Van Kitchen Projects
Picking a surface that balances durability, weight, and water resistance shapes a successful mobile kitchen build.
Solid Surface Options
Solid surface materials like Corian are nonporous and repairable. They create a seamless look and stand up well to water. That makes them a premium option for higher-end builds.
Lightweight Laminate Benefits
Laminate is the lightest choice, often 3–4 lbs per square foot. It keeps weight down, fits a tight budget, and is easy to cut and glue during install. For simple straight cuts, a table saw works well.
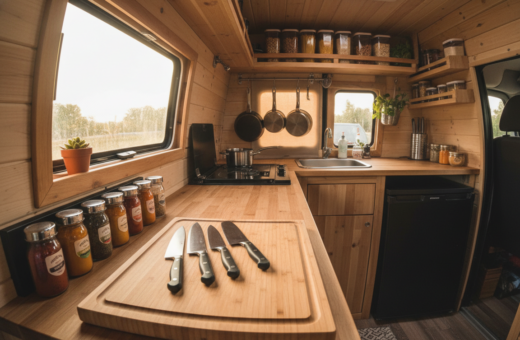
Wood and Butcher Block Considerations
Wood, such as pine, gives a warm look but needs a protective finish to resist moisture and wear. When planning the frame, ensure the base and cabinet structure support the chosen material during travel.
- Stainless steel is heat-resistant and durable, but needs pro cutting and fitting.
- Leave holes for plumbing and use a cardboard template to check fit against walls.
- Integrate drawers to expand prep area and organize tools while on the road.
Planning Your Layout and Structural Support
A clear layout and solid framing make the difference between a functional mobile kitchen and one that sags after a season. Early planning saves time and avoids costly fixes later.
Place the stove and sink thoughtfully. Ensure enough clearance from surrounding walls to prevent heat damage. Measure appliance depths and allow workspace around the cooktop.
Build a strong frame under the counter so the walls do not carry the load alone. Long edge runs along walls often need added support to prevent flexing.
- Distribute weight evenly across the cabinet frame to stop sagging over time.
- Design in a fold-out table to expand prep space without losing floor area.
- Confirm the frame can carry heavy pots, a stove, or a cast iron pan during travel.
Careful measuring and a robust build create a professional look and a workspace that improves daily life on the road. Proper support is the foundation of durable kitchens in any van or camper build.
Essential Tools for a Successful DIY Installation
Before cutting anything, gather tools that match the materials and the job. Proper prep saves time and prevents costly mistakes during an install in a small van or camper layout.
Must-Have Power Tools
A cordless drill and a quality jigsaw are the core tools. The jigsaw handles curved cuts and sink holes in laminate, wood, and many solid surface panels.
- Jigsaw: Ideal for cutting the 15×15 inch stainless steel sink opening and other precise holes.
- Specialized blades: Use metal or fine-tooth blades for stainless steel and low-chip blades for laminate or wood.
- Painter’s tape: A simple tip—mask cutting lines to reduce chipping on the surface.
- Screwdriver and drill bits: Secure the countertops to the cabinet frame and fasten the faucet and sink hardware.
Investing a little more in quality tools reduces the time spent fixing errors. With the right kit, the installation looks professional and lasts through travel and daily use.
Preparing Your Surface and Cabinetry
Proper prep starts at the frame: check fasteners, level the base, and clear debris before laying any material. The cabinet must sit flat so the countertop will not rock or gap.
Clean and sand the existing surface so finishes and sealants bond well. When working with wood, apply a high-quality sealant to protect the surface from water and wear. Select materials that match the weight limits and the intended use of the space.
Before final install, confirm drawers and doors operate smoothly. Measure clearances so you don’t lose usable space. In a van or a camper, a small misalignment can cause big problems during travel.
- Remove dust and debris; a clean workspace prevents bonding issues.
- Verify the cabinet base is level and free of bumps that show through countertops.
- Sand and seal any exposed wood edges to reduce swelling and rot.
- Trim side edges and seal joints to stop water from entering the cabinet and damaging the base.
Take time on prep and the finished kitchen will feel solid, look professional, and last through the build and years of travel.
Installing Your New Countertop and Sink
A secure fit and careful sealing are the final steps that protect your prep area.
Securing the counter starts from below. They drive short screws up through the cabinet frame into the underside of the countertop to hold it firm.
Securing the Countertop
Make sure the screws are short enough so they don’t pierce the top surface. During travel, vibrations loosen hardware, so check fasteners after the first few trips.
Sealing Edges and Backsplashes
Use silicone sealant around the sink and along wall edges to stop water from reaching the frame. Proper edge prep extends the life of the surface and keeps cabinets dry.
- Cut sink holes with a jigsaw and sand wood edges to remove splinters.
- Follow the faucet and sink manufacturer’s instructions so the plumbing stays leak-free.
- Add a small trim or backsplash piece to cover gaps between the wall and top.
- Check the fit and weight support at the frame so the look stays flat and solid.
Tip: After install, run a water test and inspect seams. That quick check saves time and prevents damage on the road.
Creative Ways to Expand Your Prep Area
A hinged extension often turns a narrow worktop into a full prep station. It folds away when not in use and frees floor space during travel.
Flip-up extensions are a great way to add extra prep space to your kitchen without taking up room when not in use. Use a sturdy piano hinge and a trimmed piece of wood that matches the existing surface to keep the look cohesive.
Make sure a strong backer inside the cabinet supports the weight when the extension is up. Check that the retracted extension does not block outlets, especially GFCI receptacles, or interfere with the stove or sink.
Smart design tricks boost function: a sliding cutting board over the sink creates extra workspace and makes cleanup easier. Add a small drawer or shelf under the extension to store knives, boards, or spices.
- Install a piano hinge for smooth, durable movement.
- Build the extension from matching wood to keep a unified look.
- Reinforce the cabinet side with a backer to handle weight and use.
- Confirm the folded piece won’t hit walls, drawers, or the stove.
Tip: For more layout ideas and small-space solutions, see practical camper van kitchen ideas at camper van kitchen ideas.
Conclusion
A well-chosen surface and careful install turn a small cook area into a durable, usable workspace.
Choosing the right countertops shapes long-term performance. Whether selecting lightweight laminate or a repairable solid surface, proper sealing and support matter most.
This diy guide gave clear steps to plan, prep, and install a reliable worktop. Prioritize weight limits, heat resistance, and moisture control so the space holds up during travel.
With the right tools and attention to seams, owners can get a professional result that makes the kitchen feel like home. See a related example on the sample project page.